


The Many Uses of Node.js stdin, stdout and stderr
The Node.js standard streams


When we run a Node.js program, a process is started for that program.
The process is like a box of system resources. It uses those resources to execute the program.
A Node.js process is initialized with three open file descriptors - stdin, stdout and stderr. These file descriptors are also known as streams.
But what are streams?
The best analogy of streams happens to be conveyor belts in a factory. Just like conveyor belts move raw materials, streams handle the flow of data.
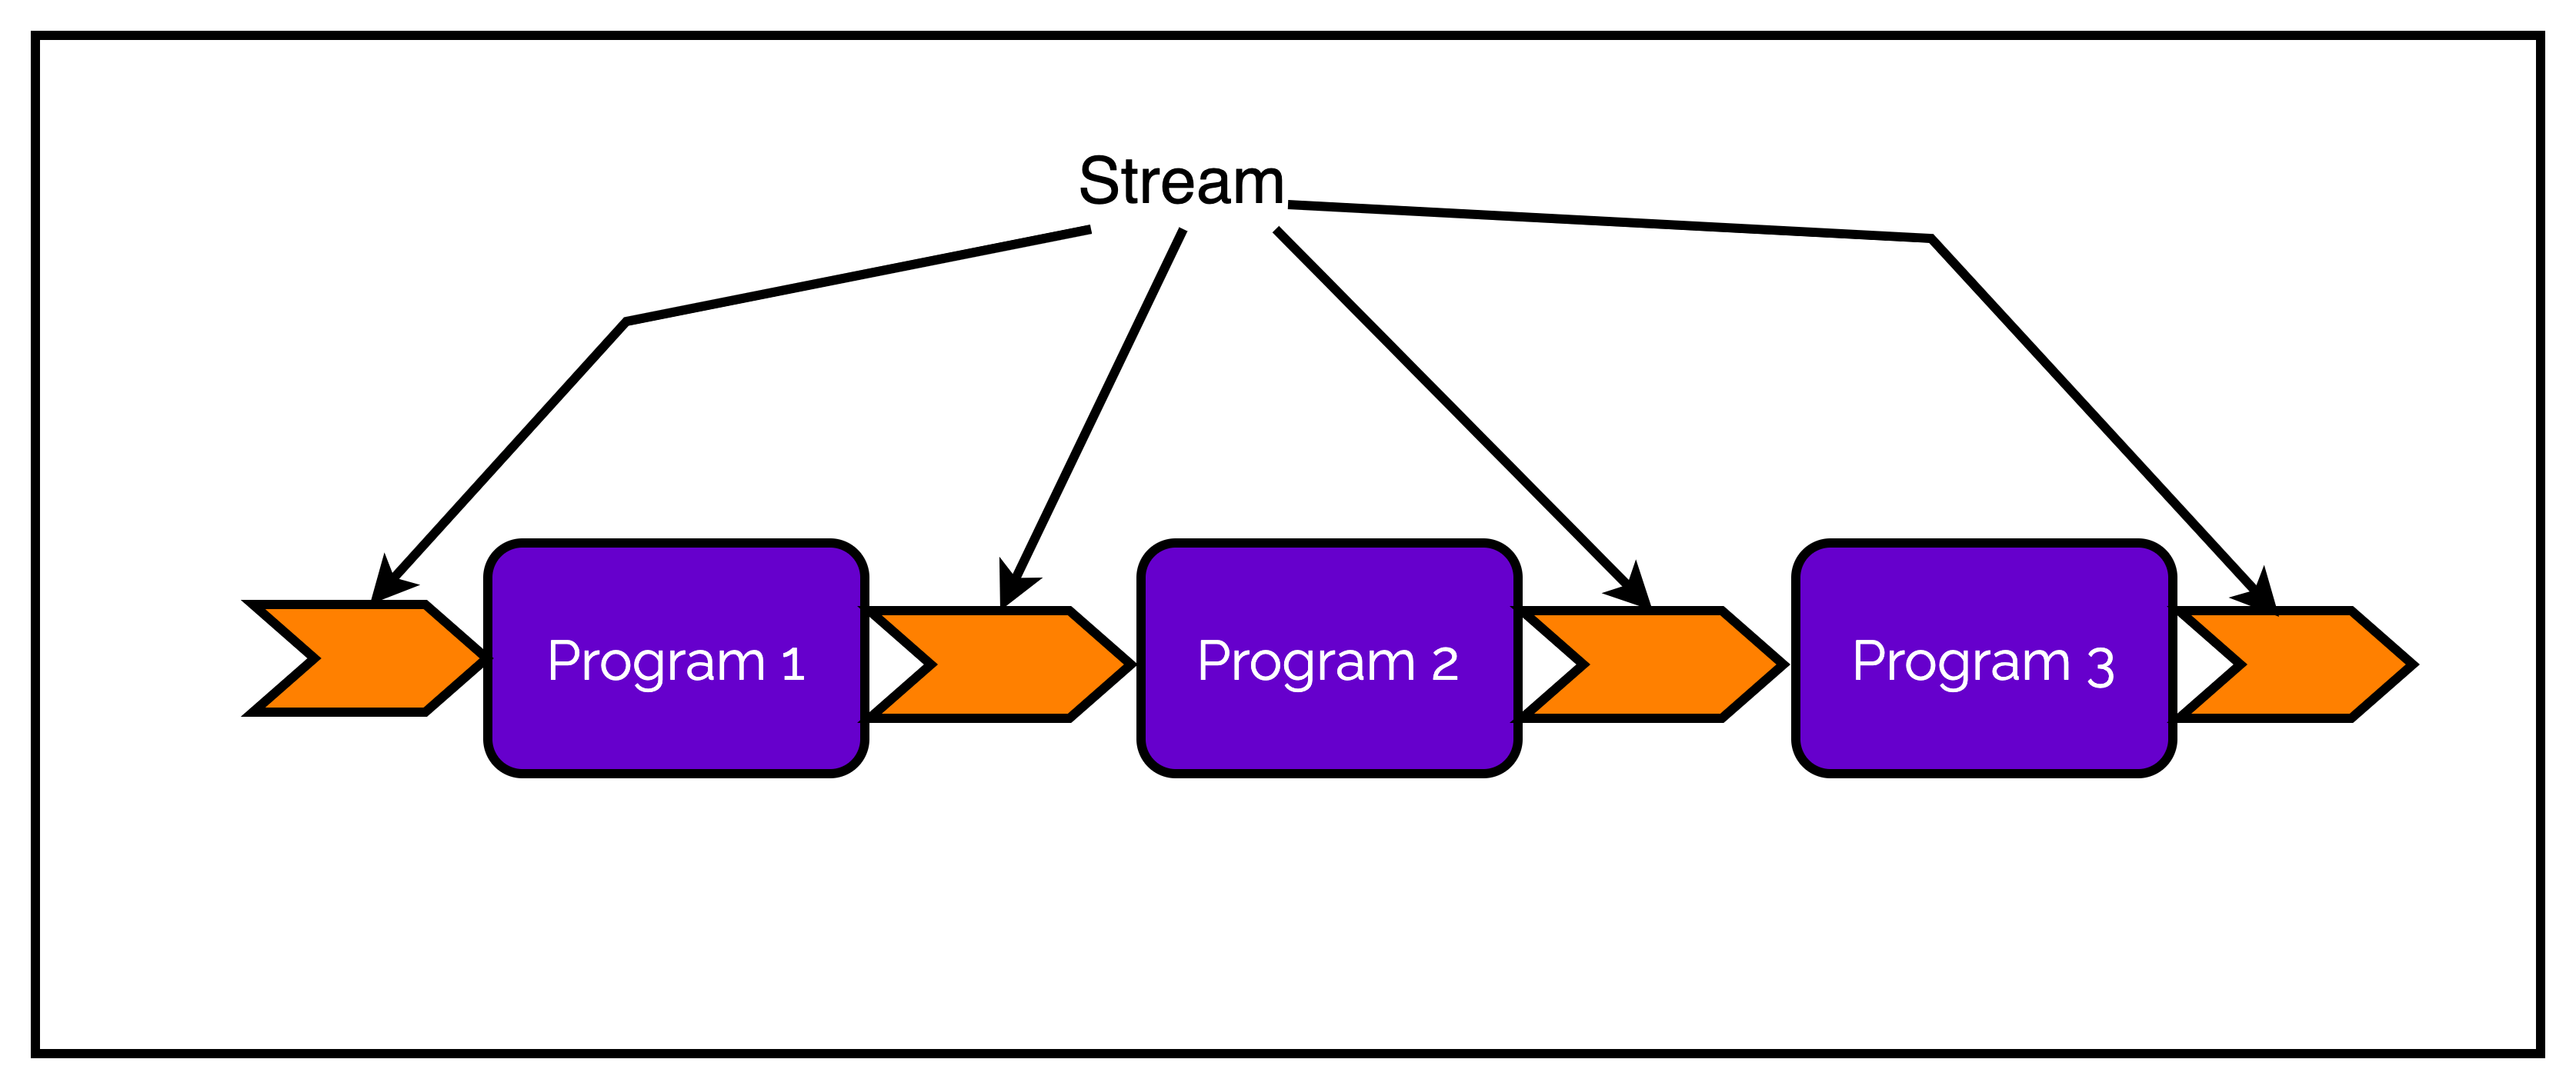
If you have visited any factory, you must have noticed a network of conveyor belts connecting several machines. Similarly, we can connect several programs using streams.
Each program connected by a stream executes a particular task to produce some output. We can pipe the output of one program as input to another to perform a bigger and more complex task. Check the below illustration.
The Scope of Streams in a Process
Multiple processes can execute the same program. But each process has its own copy of the program.
Also, each process gets its own address space and control thread. The same is the case with the standard I/O streams such as stdin, stdout and stderr.

In the context of a process, each of these streams has a specific purpose:
stdinis the standard input stream and a source of input for the program.stdoutis the standard output stream and a source of output for the program.stderris the standard error stream and is used for error messages.
The simplicity of the standard streams makes them suitable for a variety of uses. You can use them to pass data between the program and its execution environment, build interactive terminals or create data flow pipelines.
Let us look at these uses for Node.js standard I/O streams with examples.
Basic Usage of stdin, stdout and stderr
Check out the below code snippet.
process.stdin.on("data", (data) => {
    console.log(data)
    const name = data.toString().trim().toUpperCase()
    if (name !== "") {
        process.stdout.write(`Hello ${name}`)
    } else {
        process.stderr.write("No input provided.")
    }
})
The process is a global object that provides control of the Node.js process.
Since standard streams are tied to the Node.js process, we can access them via the process object.
But what are doing in the above program?
Each of the I/O channels emits data events for every chunk of data
First, we need to tell the program to listen for user input or the
dataevent. This is done using theprocess.stdin.on()function. This function takes the event name (data) and a callback function as input. The received data is passed to the callback function.The data event returns a
Bufferobject. TheBufferobject (nameddata) is a binary representation of the input.Within the callback function, we convert the
Bufferobject to a string using thetoString()function. Thetrim()function removes the newline character that removes the end of each input.Next, we write to STDOUT and STDERR using
process.stdoutandprocess.stderrproperties of theprocessobject.
You might be using
console.log()andconsole.err()for outputting data to the console. Under the hood, the console statements also useprocess.stdoutandprocess.stderr.
Building an Interactive Terminal
The first example was extremely simple and simply demonstrated the basic usage of Node.js I/O streams.
However, we can also use these standard streams for more interesting applications.
For example, what if we want to build an interactive terminal where the program asks a question to the user and does something when the user answers? Of course, we are talking about the birth of artificial intelligence!
Check out the below code.
const readline = require('readline')

const rl = readline.createInterface({
    input: process.stdin,
    output: process.stdout
})

function query(question) {
    rl.question(question, (answer) => {

        if(answer === 'e') {
            process.exit(1)
        }

        rl.write(`The answer to the question is: ${answer}\n`)
        query(question)
    })
}

query("What is your name? ")
In this example, we are also making use of the readline module. readline is a Node.js module that provides an interface for reading data from a Readable stream such as stdin one line at a time.
The readline.createInterface() method creates a new instance of the readline.Interface using process.stdin and process.stdout.
Next, we have a function named query() that asks a question to the user using the readline module. The rl.question() performs all the heavy lifting:
Displays the
queryby writing it to theoutputWaits for user input to be provided on
inputInvokes the callback function passing the provided input as the first argument.
This program continues forever until we press Ctrl ^ C. To make it stop programmatically, we call process.exit(1) whenever the user provides "e" or "exit" as the answer.
Piping Data using Node.js I/O Streams
There are even more practical uses of Node.js I/O streams than interactive terminals.
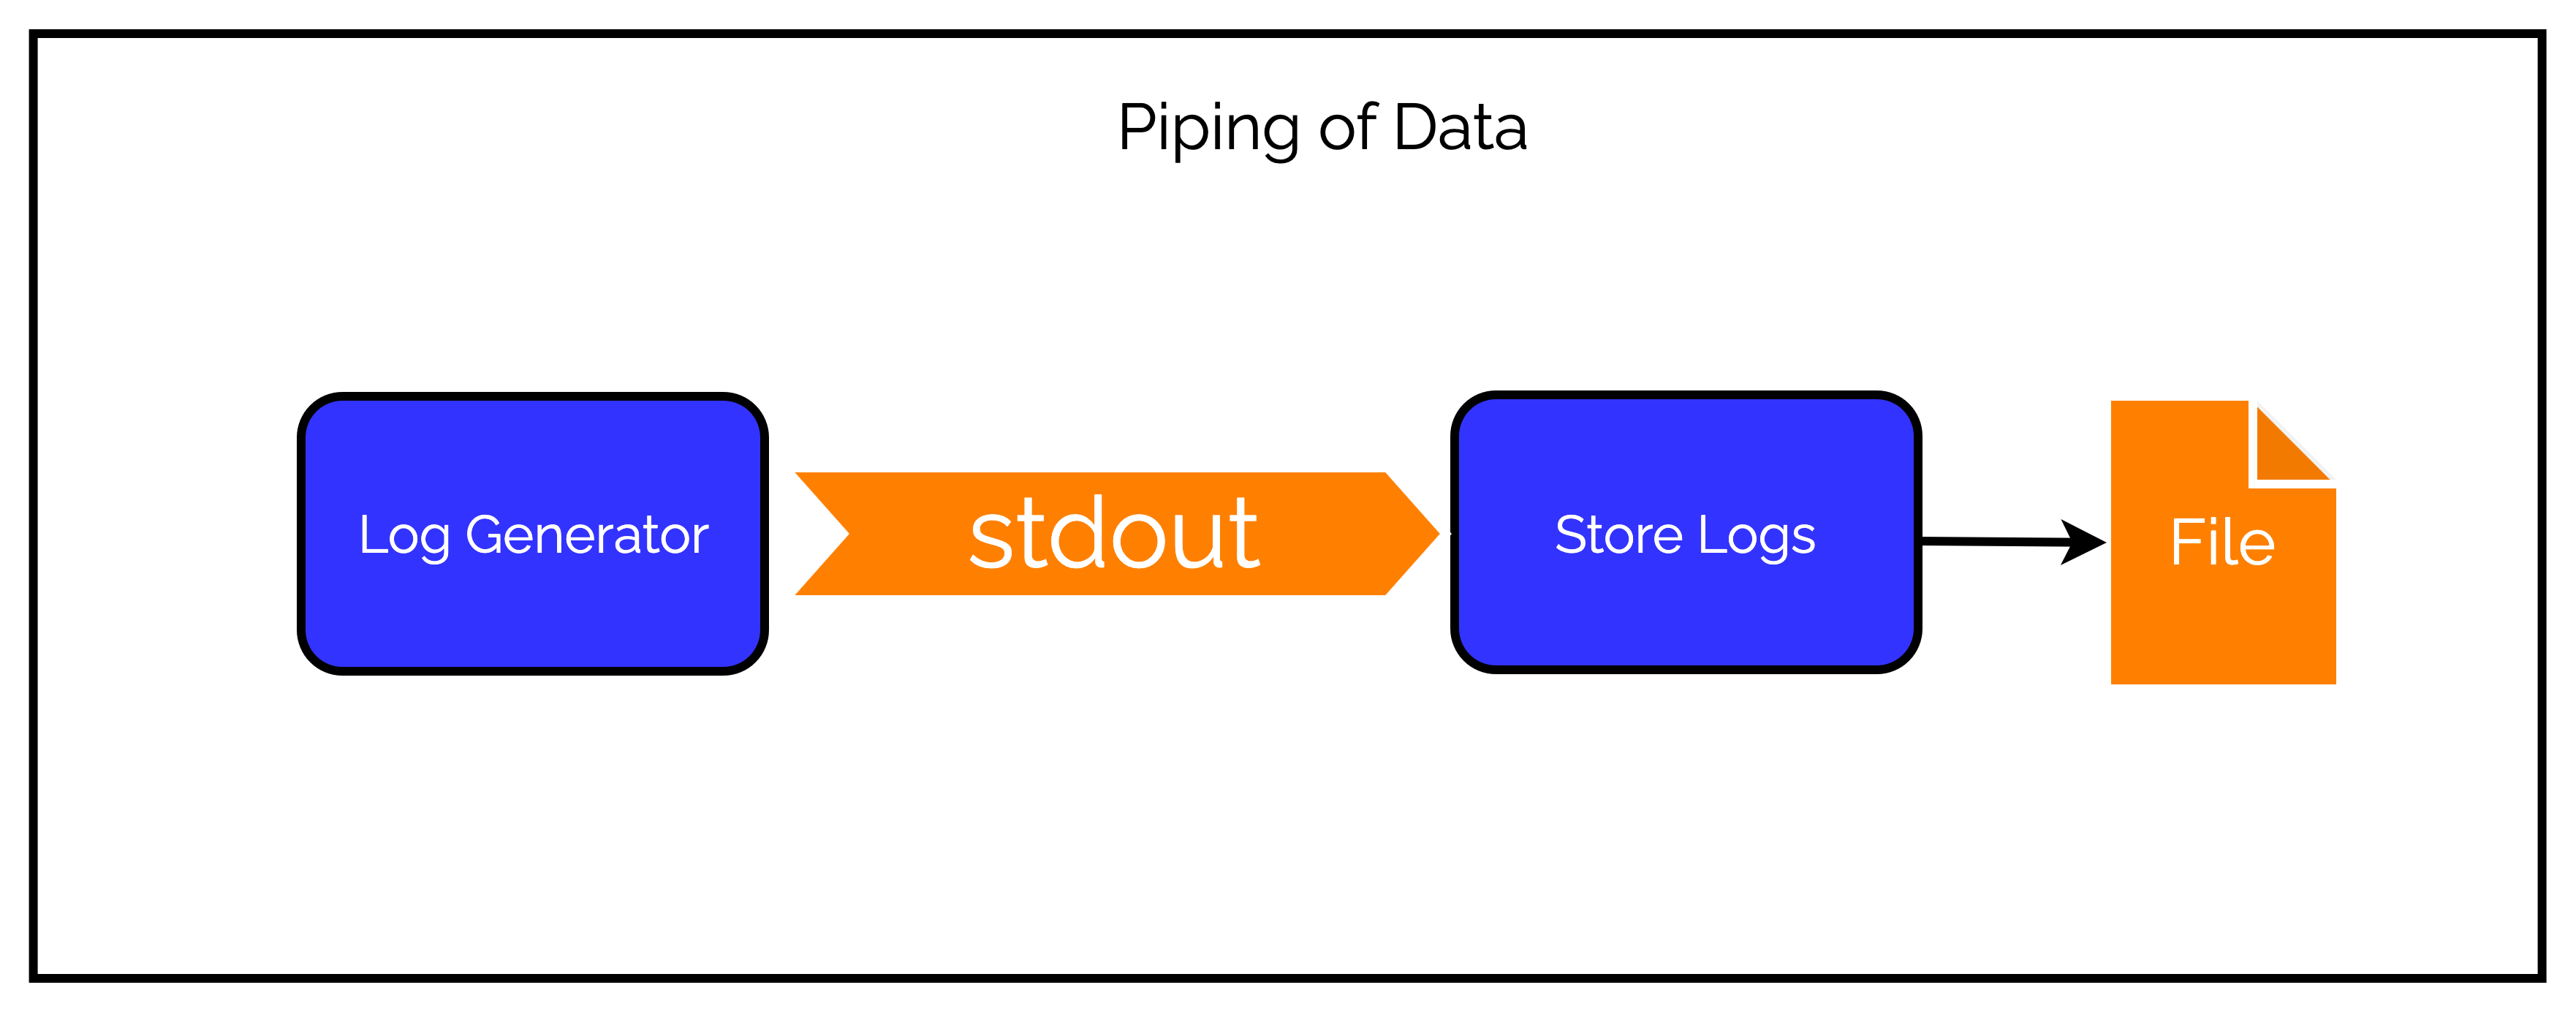
We can use Node.js I/O Streams to pipe data from one program to another in a workflow approach.
To demonstrate this, we will create two programs - one to generate logs and another to store the logs in a file. The catch is that only logs printed to stdout will be stored in files. Any error logs are piped using the stderr descriptor and printed to the terminal.
First, we will create the program for generating logs. Check out the below code from logger.js.
const logObject = [
    {
        type: "normal",
        message: "SUCCESS MSG 1"
    },
    {
        type: "normal",
        message: "SUCCESS MSG 2"
    },
    {
        type: "error",
        message: "ERROR!"
    },
    {
        type: "normal",
        message: "SUCCESS MSG 3"
    }
]

function logger() {
    logObject.forEach(log => {
        setTimeout(() => {
            if (log.type === "normal") process.stdout.write(log.message)
            else process.stderr.write(log.message + '\n')
        }, 1000)
    })
}

logger()
Here, we have a bunch of dummy log objects. In the logger() function, we go through the list of these log objects one by one. If a log is of type normal, we write it to process.stdout. Else, we write it to stderr.
Next, we create a program that stores the logs in a file. See the below code for store-logs.js.
const fs = require("fs")

fs.open("./log-file.txt", "w", (err, fd) => {
    if (err) throw Error(err.message)
    process.stdin.on("data", data => {
        fs.write(fd, data.toString() + "\\n", (err) => {
            if (err) throw Error(err.message)
        })
    })
})
After opening a file in write mode, we utilize the input stream process.stdin to receive the incoming log messages and write them to the file.
To run these programs, we run the below command:
$ node logger.js | node store-logs.js
Basically, we are piping the output of logger.js as input to store-logs.js.
After execution, we can check the output in the file and terminal.
The normal logs are written to the file whereas the error logs are piped via the stderr file descriptor and printed to the terminal. This is as per the standard behaviour of stderr.
Concluding Thoughts
Node.js standard I/O streams such as stdin, stdout and stderr are simple but extremely effective in several use cases.
Streams are an integral part of Node.js and the basic knowledge from this post will help us understand more advanced concepts down the line.
If you enjoyed this article or found it helpful, let's connect. Please hit the Subscribe button at the top of the page to get an email notification about my latest posts.
You can also connect with me on other platforms: