


Kafka's Custom Partitioning can support your business growth
Control the flow of messages according to your business needs


Why do you need custom partitioning in Kafka?
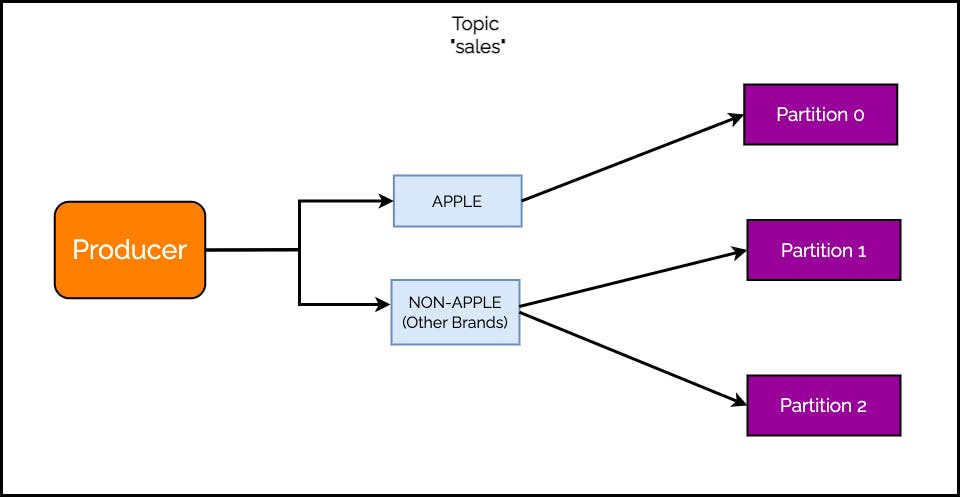
Imagine that you are running an e-commerce store for electronic devices. Going into the holiday season, your business forecast predicts a significant increase in the sales of other brands when compared to Apple devices.
Every sale transaction goes through a Kafka broker and you want to ensure there are no resource issues with the data flow. Out of the three Kafka partitions for handling sales data, you want to dedicate two for non-Apple devices and only one for Apple devices.
Check out the below illustration that describes the requirements.
The reason behind custom partitioning is often a business requirement. Even though Kafka has a default partitioning mechanism, the business requirement creates a need for a custom partitioning strategy.
Of course, the example requirement is a little contrived. But it does not matter. All that matters is that you need to perform custom partitioning or the business might suffer due to excessive load.
Thankfully, Kafka provides a ready-to-use mechanism to implement custom partitioning.
Creating a Custom Partitioner Class
We need a place to keep our custom partitioning logic. For this purpose, Kafka provides a Partitioner interface. We need to implement this interface and override the necessary methods with our custom logic.
Check out the below code for the BrandPartitioner class:
package com.progressivecoder.kafkaexample;

import org.apache.kafka.clients.producer.Partitioner;
import org.apache.kafka.common.Cluster;
import org.apache.kafka.common.InvalidRecordException;
import org.apache.kafka.common.PartitionInfo;
import org.apache.kafka.common.utils.Utils;

import java.util.List;
import java.util.Map;

public class BrandPartitioner implements Partitioner {

    private String brand;

    @Override
    public int partition(String topic, Object key, byte[] keyBytes, Object value, byte[] valueBytes, Cluster cluster) {
        int chosenPartition;

        List<PartitionInfo> partitions = cluster.partitionsForTopic(topic);
        int numPartitions = partitions.size();

        if ((keyBytes == null) || (!(key instanceof String))) {
            throw new InvalidRecordException("All messages should have a valid key");
        }

        if (((String) key).equalsIgnoreCase(brand)) {
            chosenPartition = 0;
        } else {
            chosenPartition = Utils.toPositive(Utils.murmur2(keyBytes)) % (numPartitions - 1) + 1;
        }
        System.out.println("For " + value + " partition chosen: " + chosenPartition);
        return chosenPartition;
    }

    @Override
    public void close() {

    }

    @Override
    public void configure(Map<String, ?> map) {
        brand = (String) map.get("partition.brand");
    }
}
To implement the Partitioner interface successfully, we need to implement three specific methods:
partition()- This is where we keep the actual partitioning logicconfigure()- This is where we receive any custom properties that might be needed to determine the correct partition. If there's no such property, you can leave the implementation blank. In our case, we receive a property namedpartition.brand. We will use it in the partitioning algorithm.close()- This is where we can clean up any resources if needed. In case of no such resources, we can keep the implementation blank
The partition() method is where the magic happens. The Kafka Producer calls this method for every record with input parameters such as topic name, key (if any) and the cluster object. The method returns the partition number as an integer value.
For our business requirement, the partitioning logic is pretty straightforward.
First, extract the information about the partitions of the topic using the
clusterinstance. This is to find the number of partitions within the topic.Next, we throw an exception if the key value is null. The key tells us whether the device is from Apple or another brand. Without the key, we won't be able to determine the partition.
Moving on, we check if the key of the current record is 'apple'. If yes, we set the value of
chosenPartitionto 0. Basically, we are saying that for brand value 'apple', always use partition 0.If the key value is not 'apple', we determine the
chosenPartitionby hashing the key, dividing it by the number of partitions and taking the mod. The mod value will turn out to be 0 or 1. Therefore, we add 1 to shift the value by 1 since we have already assigned partition 0 to 'apple'. Ultimately, we will get a value of 1 or 2 for other brands.Finally, we return the
chosenPartitionvalue.
Configuring the Kafka Producer
The custom partitioning class is ready. However, we still need to tell the Kafka Producer to use this particular class while determining the partition.
Check the below code:
package com.progressivecoder.kafkaexample;

import org.apache.kafka.clients.producer.*;

import org.apache.kafka.common.serialization.StringSerializer;
import org.springframework.boot.CommandLineRunner;
import org.springframework.boot.SpringApplication;
import org.springframework.boot.autoconfigure.SpringBootApplication;
import java.util.Properties;

@SpringBootApplication
public class KafkaExampleApplication implements CommandLineRunner {

    public static void main(String[] args) {
        SpringApplication.run(KafkaExampleApplication.class, args);
    }

    @Override
    public void run(String... args) throws Exception {
        Properties kafkaProps = new Properties();
        kafkaProps.put(ProducerConfig.BOOTSTRAP_SERVERS_CONFIG, "localhost:9092");
        kafkaProps.put(ProducerConfig.KEY_SERIALIZER_CLASS_CONFIG, StringSerializer.class);
        kafkaProps.put(ProducerConfig.VALUE_SERIALIZER_CLASS_CONFIG, StringSerializer.class);
        kafkaProps.put(ProducerConfig.PARTITIONER_CLASS_CONFIG, BrandPartitioner.class);
        kafkaProps.put("partition.brand", "apple");

        Producer<String, String> producer = new KafkaProducer<>(kafkaProps);

        try {
            for (int i = 0; i <= 20; i++) {
                if (i < 3) {
                    ProducerRecord<String, String> apple =
                            new ProducerRecord<String, String>("topic-1", "apple", "Selling Apple Device");
                    producer.send(apple, new DemoProducerCallback());
                } else {
                    ProducerRecord<String, String> samsung =
                            new ProducerRecord<String, String>("topic-1", "others_" + i, "Selling Other Device");
                    producer.send(samsung, new DemoProducerCallback());
                }
            }
        } catch (Exception e) {
            e.printStackTrace();
        }
    }
}

class DemoProducerCallback implements Callback {
    @Override
    public void onCompletion(RecordMetadata recordMetadata, Exception e) {
        if (e != null) {
            e.printStackTrace();
        }
    }
}
There are several steps over here:
First, we create a
Propertiesobject and add the necessary properties to it. Apart from the mandatory properties such as server details, key and value serializers, we add thePARTITIONER_CLASS_CONFIGand thepartition.brandproperties.The
PARTITIONER_CLASS_CONFIGholds the name of the custom partitioner class that we already created.partition.brandis not a Kafka Producer configuration property. It is a custom property. We are using it to supply the name of the brand that needs to receive special treatment so that we can avoid hard-coding it in the custom partitioner. This is good practice as it makes our custom partitioner class independent from brand-specific logic.In the remaining code, we are simply sending a bunch of messages to the Kafka broker. Some messages are for 'apple' devices while the rest belong to other brands.
If we run our application now, we will see the below response:
For Selling Apple Device partition chosen: 0
For Selling Apple Device partition chosen: 0
For Selling Apple Device partition chosen: 0
For Selling Apple Device partition chosen: 0
For Selling Other Device partition chosen: 2
For Selling Other Device partition chosen: 2
For Selling Other Device partition chosen: 1
For Selling Other Device partition chosen: 1
For Selling Other Device partition chosen: 2
For Selling Other Device partition chosen: 1
For Selling Other Device partition chosen: 1
For Selling Other Device partition chosen: 2
For Selling Other Device partition chosen: 2
For Selling Other Device partition chosen: 1
For Selling Other Device partition chosen: 1
For Selling Other Device partition chosen: 1
For Selling Other Device partition chosen: 2
For Selling Other Device partition chosen: 2
For Selling Other Device partition chosen: 1
For Selling Other Device partition chosen: 1
For Selling Other Device partition chosen: 1
For Selling Other Device partition chosen: 1
For Selling Other Device partition chosen: 1
For Selling Other Device partition chosen: 2
The data belonging to the 'apple' device only goes to partition 0. However, non-apple messages go to partition 1 or 2 depending on our partition logic.
Concluding Thoughts
Custom partitioning in Kafka is an important tool in high-load scenarios.
It provides a way to optimize and distribute traffic efficiently. The great part about custom partitioning is the flexibility with which we can implement the logic for determining partitions.
That was all for this post! We will be covering more aspects of Kafka in upcoming posts.
If you are new to Kafka, I would suggest you go through our post on the helicopter view of Kafka.
If you enjoyed this article or found it helpful, let's connect. Please hit the Subscribe button at the top of the page to get an email notification about my latest posts.
You can also connect with me on other platforms: